In my last article INSTALLING HADOOP SINGLE NODE CLUSTER ON UBUNTU , I discussed about how to install a single node hadoop cluster on Ubuntu 12.04.
Going forward in this tutorial we will learn how to set up a multinode cluster using two or three independent single node cluster.
PREREQUISITE
As a prerequisite first we will set up two or three single node hadoop clusters using the previous post and then we will merge it to set up a complete multi node distributed hadoop cluster of two or three nodes. In this tutorial I will go with an assumption that we have three individual Ubuntu setups with single node hadoop cluster installed.
CONFIGURATIONS
Now we will modify certain configurations to make one of the three nodes as the "Master Node"(which will also act as slave) and the other two nodes as the "Slave Node".
Before continuing to make the configurations we will shut down all the single node clusters indivisually. Move to the hadoop/bin directory and type stop-all.sh with hadoop user in control.

Do this individually for all the three single node clusters. Type JPS to ensure that none of the hadoop daemons are running on any of the clusters.

Now go to the /etc/hosts file on each of the machine and list out the ip address and the hostname of all the three machines. Open the file with sudo user i.e. the user which had sudo access. This is necessary so that all the three machines recognize each other. The format for specifying the host name and the ip will be :-

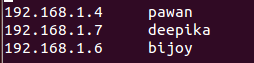
Do this for all the three machines.
Note :- The hadoop user in all the three machines is bijoy.
If you followed my previous document for setting up a single node hadoop cluster, then the public SSH key for the hadoop user of the master node should be in $HOME/.ssh/id_rsa.pub
Now we just have to copy the SSH key of the hadoop user of the master node to the authorized_keys file of the hadoop user of the slave nodes which should be in $HOME/.ssh/authorized_keys.
We will issue the following command to distribute the ssh key of the hadoop user of the master node.
Issue this command on the machine which you want to keep as the master node.


Here bijoy is the hadoop user for both the machines and bijoy and deepika are the hostname for voth the machines respectively.
This command will ask for the login password for the hadoop user on the slave node on which you are copying the master node's SSH key , then will copy the SSH key for you, and create the correct directory setting up the permissions as required.
Repeat the same process for the other slave nodes also.
Next, we have to test the SSH setup. We will do it in three steps :-

In the above image pawan is the master node.

\
In the above image bijoy is one of the slave nodes.
Following are the daemons that will run on the master node and the slave nodes :-


To format the HDFS via namenode we will issue the following command on our namenode :-


Do this individually for all the three single node clusters. Type JPS to ensure that none of the hadoop daemons are running on any of the clusters.
Now go to the /etc/hosts file on each of the machine and list out the ip address and the hostname of all the three machines. Open the file with sudo user i.e. the user which had sudo access. This is necessary so that all the three machines recognize each other. The format for specifying the host name and the ip will be :-
<ip> <hostname>
Do this for all the three machines.
SSH CONTROL
Now we will ensure that the hadoop user on the master node should be able to connect to itself and also to the slave nodes without any password authentication.Note :- The hadoop user in all the three machines is bijoy.
If you followed my previous document for setting up a single node hadoop cluster, then the public SSH key for the hadoop user of the master node should be in $HOME/.ssh/id_rsa.pub
Now we just have to copy the SSH key of the hadoop user of the master node to the authorized_keys file of the hadoop user of the slave nodes which should be in $HOME/.ssh/authorized_keys.
We will issue the following command to distribute the ssh key of the hadoop user of the master node.
Issue this command on the machine which you want to keep as the master node.
Here bijoy is the hadoop user for both the machines and bijoy and deepika are the hostname for voth the machines respectively.
This command will ask for the login password for the hadoop user on the slave node on which you are copying the master node's SSH key , then will copy the SSH key for you, and create the correct directory setting up the permissions as required.
Repeat the same process for the other slave nodes also.
Next, we have to test the SSH setup. We will do it in three steps :-
- First we will connect from master node to master node.
In the above image pawan is the master node.
- Secondly, we will connect from master node to the first slave node.
In the above image deepika is one of the slave nodes.
- Lastly, we will connect from the master node to the second slave node.

\
In the above image bijoy is one of the slave nodes.
MASTER AND SLAVE NODE CONFIGURATIONS
Now we will do the configurations for making one node as the master node and the other two as slave nodes. The master node will also act as a slave node because we want more space for spreading the data storage and more machines to process data in parallel.Following are the daemons that will run on the master node and the slave nodes :-
- The Namenode for the HDFS will run on the master node.
- The JobTracker for the MapReduce layer will run only on the master node.
- The Datanode for the HDFS will run on all the three nodes.
- The Tasktracker for the MapReduce will run on all the three nodes.
- hadoop/conf/masters
This file specifies the node on which the secondary node on which the secondary namenode will run in the multi-node cluster. Here we will specify the master node for the secondary namenode to run.
Secondary namenode is not a substitute for the primary namenode. It does the following tasks:-
- It gets the edit logs from the namenode in regular intervals and applies to fsimage.
- When it has a new fsimage, it is copied back to the namenode.
- Namenode uses this image for the next restart which reduces the startup time.
The machine on which we will execute the bin/start-dfs.sh script will become the namenode and the machine on which we will execute the bin/start-mapred.sh script will become the jobtracker.
Coming back to the masters file. we will specify the hostname of the node in which we want to start the secondary namenode . Here we will specify the master node as we do not have too many nodes.
So make the master node entry in the masters file by specifying the hostname for the master node as shown :-
- hadoop/conf/slaves
In this file we have to list out the hostnames of the machines which will act as the slave nodes. That is the machines in which the datanode and the tasktracker daemon will run. In our case all the three machines will be the slaves including the master node.
So specify the hostname of all the three machines in the slaves file as shown :-
- hadoop/conf/core-site.xml
This file has to be altered in all the three machines. First, we have to specify the namenode for our multi-node hadoop cluster. So we will edit the value of the property fs.default.name in this file. In this property we have to specify the hostname of our master node as the namenode as shown :-
- hadoop/conf/mapred-site.xml
Next we have to specify the node that will run the jobtracker for our multi-node hadoop cluster. So we will edit the value of the property mapred.job.tracker in this file. In this property also we have to specify the hostname of our master node as the jobtracker as shown :-
- hadoop/conf/hdfs-site.xml
Lastly we have to set the replication factor of our multi-node hadoop cluster. Replication factor decides that, to how many nodes the data will be replicated before it is available for use. What we specify in this file's property will be the default replication factor of the cluster.
So we will edit the value of the property dfs.replication in this file. In this property we will specify the value as 3 as we have three slave nodes available for replication. We shouldn't specify it more than the number of slave nodes as it will result in an error. So we specify the value as shown :-
Then add one more property data.dfs.dir in the hdfs-site.xml for setting up the path for the data to be stored in hdfs. Do this in all the nodes, the master node as well as the slave nodes.
FORMATTING THE HDFS
We will now format hadoop's distributed file system via the namenode before we start our new multinode cluster. This is needed only when we setup the cluster for the first time.To format the HDFS via namenode we will issue the following command on our namenode :-
STARTING THE MULTINODE HADOOP CLUSTER
We will now start our new hadoop multi-node cluster :-
- We will first start the HDFS daemon that is the Namenode and the Datanode. Issue the bin/start-dfs.sh command on the master node. This will run the namenode on the machine on which you issued the command and the datanode on the machines listed in the slaves file in the conf directory (i.e. all the machines in our case). The secondary namenode will be started in the master node in our case.
On the slave nodes we can check the success or failure of this command by looking at the log file in the hadoop/logs/hadoop-bijoy-datanode-deepika.log in the machine named as deepika and hadoop/logs/hadoop-bijoy-datanode-bijoy.log in the machine named as bijoy.

Now issue the jps command on the master node. If everything went right it should list the namenode, secondary namenode and the datanode as shown :-
Now issue the jps command on both of the slave nodes. If everything went right it should list the datanode as shown :-
- Next we will start the MapReduce daemon that is the Jobtracker and the Tasktracker. Issue the bin/mapred-dfs.sh command on the master node. This will run the Jobtracker on the machine on which you issue the command and Tasktracker on the machines listed in the slaves file in the conf directory(i.e all the machines in our case.
On the slave nodes we can check the success or failure of this command by looking at the log file in hadoop/logs/hadoop-bijoytasktracker-deepika.log in the machine named as deepika and hadoop/logs/hadoop-bijoy-tasktracker-bijoy.log in the machine named as bijoy.
Now issue the jps command on the master node. If everything went right it should list the namenode, secondary namenode, datanode, jobtracker, and tasktracker as shown :-
Now issue the jps command on both of the slave nodes. If everything went right it should list the datanode and the tasktracker as shown :-
STOPPING THE HADOOP CLUSTER
For stopping our hadoop multinode cluster we will go the reverse way.- First we will stop the MapReduce daemons by issuing the command bin/stop-mapred.sh on the namenode.
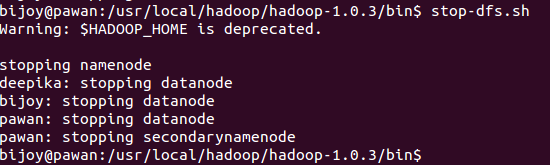
- Next we will stop the HDFS daemons by issuing the command bin/stop-dfs.sh on the namenode.
- Now issue the JPS command to check whether the HDFS and the MapReduce daemons have been stopped or not.
First check in the master node.
Then check in both the slave nodes with the same JPS command.
So this is how we setup a multinode hadoop cluster.
Hope this will be useful.
Thanks & Regards
Bijoy
I admire the way you brought out the general essence of your topic. Thanks for this blog.
ReplyDeleteHadoop Training in hyderabad